Getting your start in IT administration is exciting but can also be a daunting experience. I landed my first IT job working a helpdesk and, in just over a year, moved into a System Administrator role. While I was generally able to get things done, I was well aware that I didn’t understand how a lot of the infrastructure worked. Domain Controllers, firewalls, hypervisors, Active Directory, Group Policy… the list goes on. It was all new to me.
As someone who learns best by building things for myself, it’s tough trying to learn new things in an already established environment. It’s rare that a core piece of infrastructure needs rebuilt and is probably not a task that would be handed to the new guy. I was interested and motivated enough to self-learn, so it was time to look for another way.
Sooner or later I came across the concept of a “home lab” (thanks /r/homelab) and that was the game changer! For a relatively low cost I could build out my own “Enterprise environment” at home and create a network from nothing. I took full advantage of this and found it to be brilliant learning experience that I still use to this day.
The Server
Back in 2015 I bought a Lenovo ThinkServer TS140. It cost me £330 (new) and is about the size of your typical desktop tower PC. It lives behind my sofa. Out of the box it came with an Intel Xeon CPU E3-1226 v3 @ 3.30GHz, 4GB 1600MHz DDR3 UDIMM RAM, a 1TB HDD and a single NIC. I didn’t think the 4GB of RAM would cut it, so I added an additional 16GB, bringing it up to a total of 20GB RAM.
This reasonably priced server is still running my home lab environment in 2021! The only other upgrade it has seen since then was the addition of an SSD, but even that was salvaged from an old laptop.
These days some people might ask why I bother running a server at home instead of hosting everything with a cloud provider. If it weren’t for the fact that I already have the server, I might consider cloud hosting. It would be a good chance to play around with Azure but, ultimately, I don’t want the recurring monthly cost. My 6 year old ThinkServer is still doing just fine. If I ever feel the need for an upgrade, I’d be tempted to look in the direction of an Intel NUC, but they’re significantly more expensive.
Installing a Hypervisor – VMware ESXi
Anyway, now that I have the physical server, I want it to be running multiple virtual servers. To do this, I install a Type 1 hypervisor. At work I use VMware’s ESXi, so that’s what I use in my home lab.
You can download, install and use VMware’s ESXi hypervisor for free. The main limitation being that you cannot run vCenter for free. vCenter is what allows you to manage multi-host clusters and do the fancy stuff like migrating running VMs between hosts. In my single server setup none of that is needed, so it’s not a deal breaker.
Installing ESXi is a breeze. You just download the installer from VMware, create a bootable USB, pop it into your server and power it on. Once it runs through the installation, all that’s really left to do is set the root password and the network settings. From there, go to your desktop machine, open your browser and go to the IP address of the server. You should be greeted with a web interface for managing the host. Done!
VMware Networking
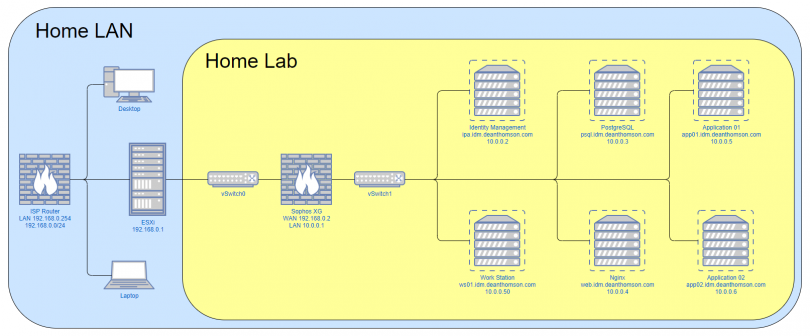
Something I like to do with my home lab environment is keep it separated from my home LAN. This allows me to more easily mimic an enterprise environment in the lab without having unwanted side effects on my home devices. E.g. I might want to run my own DHCP and DNS servers in the lab but don’t want my normal devices using those services. I do this by using virtual switches in VMware and creating a separate network that only exists in the virtual environment. However, it is useful to be able to access the lab from my main desktop PC, so I use a firewall (also a virtual machine) to act as a gateway between the two networks. I then set a route on my PC to send traffic for that network through the gateway. More on that later.
In VMware I need to create two vSwitches. vSwitch0 is linked to the physical NIC on the Lenovo server. vSwitch1 is not linked to a physical NIC. I then create a couple of Port Groups in VMware: External, which is associated with vSwitch0 and Internal, which is associated with vSwitch1.
Whenever I add a new VM within VMware, I link it’s virtual NIC to the “Internal” port group (vSwitch1). This means that all my VMs can speak to each other, but don’t have direct access to my home LAN or the internet. Again, I’ll address this in the next section, but the end goal is to get the network looking something like the diagram below. If you click on the image an enlarged version will open in a new tab.

Adding a Firewall – Sophos XG
As I mentioned earlier in the post, the firewall is used to act as a gateway between my home LAN and the lab environment. It runs as a VM with two virtual NICs. One NIC is linked to the “External” port group and the other is connected to the “Internal” port group. This gives the firewall VM access to both networks. The other virtual servers can use the firewall as their default gateway and speak to the outside world, assuming firewall rules exist to allow this.
Normally I use pfSense for my firewall, but this time I wanted to try something different. At work we use Sophos UTM but now often hear that Sophos XG is the product that Sophos would prefer you to use. As it turns out, Sophos allow you to use either firewall free of charge for home use. UTM Home Edition comes with the limitation of only allowing management of 30 IP addresses. XG Home Edition, on the other hand, imposes a hardware limit of 4 CPU cores and 6GB RAM. Other than that, it’s the same product as the paid for enterprise version. In my lab I’m unlikely to exceed either limit so the home editions are great to play with.
I actually had a bit of a rough time installing Sophos XG, but it turned out to be completely my fault. By default, Sophos XG only allows access to the admin interface from the LAN port (my internal virtual network). I wanted to do the initial setup from my desktop PC, which is on the WAN (my home LAN) side. After some fiddling in the XG console, I found a command that allowed access from the WAN port:
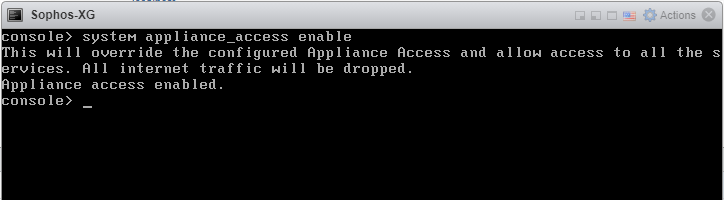
system appliance_access enable
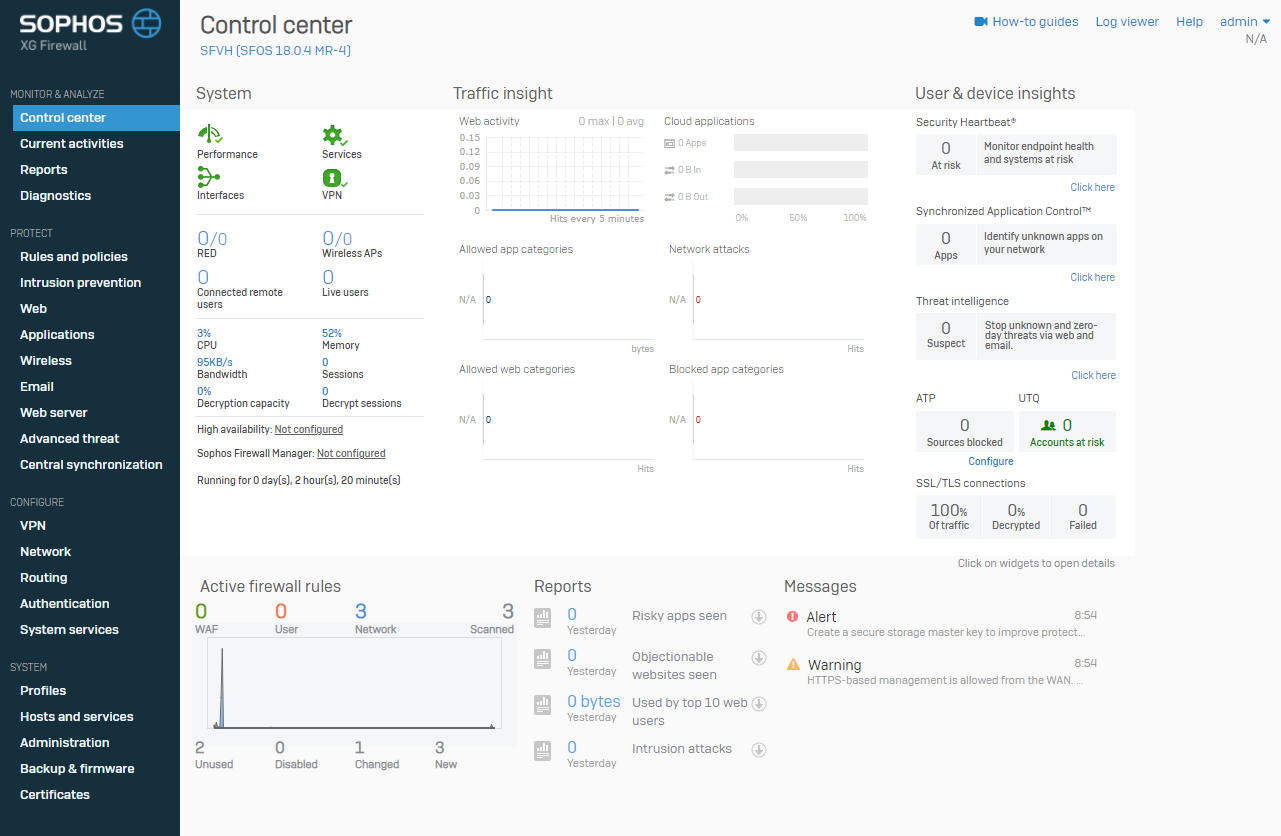
This did the trick and I could now access the admin interface from the WAN port. Sophos XG definitely feels far more user friendly than the convoluted screens of Sophos UTM but I’ve seen others comment that it lacks the full feature set of UTM. Regardless, it’s perfectly fine for my use case. It took no time to get my firewall rules set up and begin testing, but testing is where the problems (of my own making!) started.
Fixing a Silly Mistake
I spent more time than I’m willing to admit trying to figure out why my VMs could not access the internet. They could resolve external DNS names, but not access the web, ping hosts, etc. I checked all the network adapter settings, I checked the VM networking settings, and checked all my firewall rules. I did all of these things multiple times. Everything was right, so why couldn’t I get internet access?
If you were paying attention to the screenshot of the “system appliance_access enable” command that I ran earlier, you’ll know the problem. The output of that command states: “All internet traffic will be dropped”. The solution was to revert that change with “system appliance_access disable”. Now, everything works as expected. Thankfully, Sophos XG has another method of allowing access to the admin interface from the WAN port without dropping all internet traffic.
Under normal circumstances you would almost never want your firewall’s management interface to be accessible from the WAN port. In my case the WAN is actually my home network (which is why I’m happy to enable access) but in an enterprise environment it will likely be “the internet”. You certainly don’t want random internet users/bots trying to find ways to exploit the management interface and gaining access to your firewall config, so don’t make it easy for them!
All Done
And with that, my initial home lab network is essentially complete. All that’s left to do is start installing some VMs and using them to learn new things.
Back in 2015 when I first set up my home lab I used it to run a Windows Domain. Microsoft provide evaluation releases of Windows Server, which you can use for 180 days free of charge. I created a couple of Domain Controllers and configured them to act as DNS + DHCP servers. From there I made sure to domain join any other Windows servers I added and even domain joined a laptop I had that was running Windows 7 Pro.
The goal was essentially to try and create a miniature version of the environment I use at work. Building a Windows Domain from the ground up is a great learning experience and far easier than you might think. You don’t have to stop there either. Setup a WSUS server. Play around with Group Policy. Configure web filtering on your firewall. Add your imaginary friends as Active Directory users!
Having the ability to play with all these technologies at home is a fantastic learning tool. Not only do you learn how all these things work, but you also learn how to troubleshoot enterprise level issues without the pressure of an entire company waiting for the fix.
If you’re trying to set up a home lab for the first time, chances are that at some point something wont work. You’ll run into issues with your network config or the firewall rules or DNS/DHCP settings. If something isn’t working, don’t give up! Spend the time to troubleshoot it. The whole point of a home lab is to learn new things and troubleshooting these types of issues is definitely a useful skill to have.