I recently purchased a copy of DevOps for the Desperate by Bradley Smith from No Starch Press. In the first chapter, it explains how to use Vagrant to create easily re-deployable VMs for use with the exercises. The examples use VirtualBox for running the VMs. Normally this wouldn’t be much of an issue but, at the time of writing, there are no VirtualBox RPMs available for the newly released Fedora 40.
After some Googling, I found that there is a libvirt plug-in for Vagrant that can be used instead of the default VirtualBox provider.
The steps below explain how I configured my system to use Vagrant and libvirt on Fedora 40. This allowed me to follow along with the book from the “Getting Started with Ansible” section.
Installation and Configuration
Everything needed can be installed using 2 Fedora package collections. @virtualization which will enable us to run VMs and @vagrant which installs Vagrant and the libvirt provider for Vagrant.
dnf install @virtualization @vagrant
Next, start and enable a couple of the virtualization daemons:
systemctl enable --now virtqemud.service
systemctl enable --now virtnetworkd.service
You will then need to add your user to the libvirt group.
usermod -aG libvirt $USER
Once added to the group, you will need to log out and back in for the group membership changes to take effect. On Fedora 40 GNOME, I found that logging out and back in using the UI option didn’t update my group membership. The following command will force a full logout for the current user session:
loginctl terminate-user $USER
Then, once logged back in, your membership of the libvirt group should be listed when running the following command:
groups
Alternately, if you don’t want to logout for whatever reason, you could also just run:
su - $USER
which will start a new shell environment with updated group membership.
At this point all the installation and configuration is complete.
However, some small changes are needed to the Vagrant file that the book uses. This is to account for us using the libvirt provider rather than virtualbox provider. Below is what my Vagrant file now looks like (with all the comments removed):
The Vagrant File
Vagrant.configure("2") do |config|
  config.vm.box = "generic/ubuntu2004"
  config.vm.hostname = "dftd"

  config.vm.provider "libvirt" do |libvirt|
    libvirt.memory = "1024"
  end

  config.vm.provision "ansible" do |ansible|
    ansible.playbook = "../ansible/site.yml"
    ansible.compatibility_mode = "2.0"
  end
end
Note that config.vm.box has been changed to “generic/ubuntu2004” as “ubuntu/focal64” does not support libvirt. I also removed a line from the Vagrant file relating to “config.vm.network”. By running:
sudo virsh net-list --all
I found that libvirt includes a default network which already had the settings I wanted. By deleting the config.vm.network line from the Vagrant file, it uses the default libvirt network settings.
Finishing Up
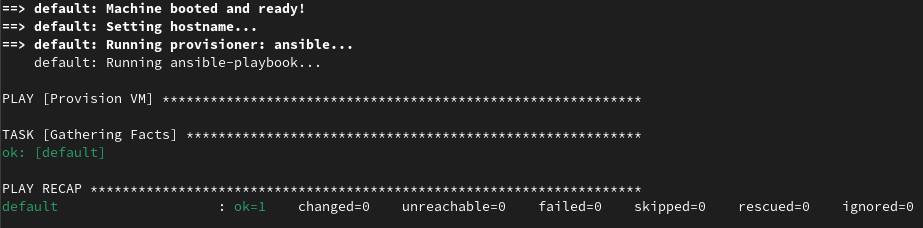
Now when I run “vagrant up” it successfully starts the VM and I can follow along with the next part of the book:
Vagrant and libvirt on Fedora 40.