There are still a lot of IT administrators out there who have never taken the time to learn PowerShell (or any scripting language). PowerShell is a great tool that can save you a lot of time by automating those repetitive and/or tedious tasks that you’re always being asked to do.
It can take some time to learn the fundamentals of scripting when you are just getting started, but it’s well worth the time investment. Eventually, someone will give you what sounds like a very repetitive/tedious task (example to come) and your first response will no longer be an internal sigh. Instead, it will be excitement at the chance to write some PowerShell! Okay, maybe that’s a slight exaggeration.
A Real Life Example
This is a “real life” example. I had a requirement to create a folder structure within a network share. Each user in a specific Active Directory group required their own folder. The name of the folder was to match that user’s AD account username. The environment I work in is reasonably small, so that results in around 100 folders. However, the number of folders doesn’t really matter here, it could just as easily have been 1,000 or 10,000.
What would your initial reaction be if asked to perform that same task? Would you launch Excel, compile a list of the users who require a folder and then create 100 folders by hand in File Explorer, marking them off as you go? There are definitely IT admins out there who would take that approach.
It’s arguably a bad approach, but the logic behind the steps involved it isn’t so bad. You could use the steps in that process as the building blocks for a PowerShell script.
Break the problem down
Stop for a minute and think about the smaller steps involved in completing the bigger task. For most people, I imagine the thought process would be something like this:
- Get a list of all users in the required AD group
- Get the usernames of all those users
- For each user in the list:
- Check to see if they already have a folder
- If one doesn’t exist, create a new folder
- If there is already a folder, move on to the next user
Now that the problem is broken down into those smaller steps, you can almost translate it line for line into PowerShell. It is already starting to look more like a script!
Writing the PowerShell script
Even if you have no experience of PowerShell at all, hopefully you can look over the code below and it will make some kind of sense. At the very least it should somewhat resemble the steps listed above.
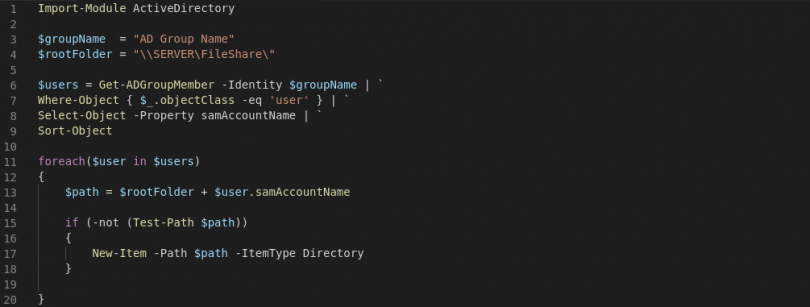
Import-Module ActiveDirectory

$groupName  = "AD Group Name"
$rootFolder = "\\SERVER\FileShare\"

$users = Get-ADGroupMember -Identity $groupName | `
Where-Object { $_.objectClass -eq 'user' } | `
Select-Object -Property samAccountName | `
Sort-Object

foreach($user in $users)
{
    $path = $rootFolder + $user.samAccountName

    if (-not (Test-Path $path))
    {
        New-Item -Path $path -ItemType Directory
    }
}
If you’ve never used PowerShell and have little or no experience of scripting, there will admittedly be parts of that code that aren’t very intuitive. You’ll likely be wondering what all the symbols mean. However, I bet if you spent some time working through a few PowerShell tutorials, most of it would make sense in no time.
How it works
Lets have a look through the script bit by bit and I’ll explain what it does.
Import-Module Active Directory
Because the script is going to be interacting with Active Directory, the first line tells the computer that we want to import all the Active Directory commands. These aren’t included as standard with PowerShell, which is why we need to import them. These actually need to be installed on the computer/server that will be running the script.
$groupName  = "AD Group Name"
$rootFolder = "\\SERVER\FileShare\"
These two lines are assigning values to variables. Think back to algebra class. If X = 4 then X + 2 = 6. X is just a placeholder for a value and that’s what $groupName and $rootFolder are. They’re just convenient names for values that we’ll be using later.
When I run this script for real I replace those dummy values with something useful. $groupName would equal the name of the AD group that contained the users. $rootFolder would contain the path to the file share that will contain all the sub-folders.
Getting the list of users
$users = Get-ADGroupMember -Identity $groupName | `
Where-Object { $_.objectClass -eq 'user' } | `
Select-Object { $_.samAccountName } | `
Sort-Object
This line, which spans multiple lines for readability, is probably the most intimidating looking bit of the script. Basically, I’m creating a list of all the usernames, sorted alphabetically, in the $users variable.
On the first line, after the “=”, I’m getting a list of all members of the AD group named $groupName. Now remember, $groupName is a placeholder that translates to the name of the AD group we’re interested in.
In the second line, “Where-Object” is acting as a filter. Because AD groups can contain more than just users as members (e.g. other groups, computers, etc.) we want to filter out everything that isn’t a user.
The third line, “Select-Object” is selecting only the attributes of the users I’m interested in. A user has many attributes, but in this case I only need the samAccountName (their username) so that’s all I pull through.
The last line “Sort-Object” is then just sorting the list of usernames alphabetically. This step isn’t really necessary. I just like processing things in order.
foreach ($user in $users)
{
    ....
}
Remember, the list of usernames lives in the $users variable. What I want to do is go through those users, one at a time, and set up their folder.
The foreach loop works it’s way through the list, user by user. The current user being processed is held in the $user variable. Notice it’s singular, rather than plural. That’s just how I like to name my variables. $users is the whole list and $user is the individual currently being processed.
For every user, it’s going to run the code between the { and } brackets.
Generating the file path
$path = $rootFolder + $user.samAccountName
I’m using a few variables in this line. I create a path variable and use it to hold the full file path of the current user’s folder, regardless of whether or not it exists. To create the path, I take the $rootFolder value, which was defined as “\\SERVER\FileShare\” and add the user’s samAccountName to the end of it. So it might end up looking like “\\SERVER\FileShare\Dean”.
Creating the folder (if needed)
if (-not (Test-Path $path))
{
    New-Item -Path $path -ItemType Directory
}
This is the part where I check if the file path already exists and, if not, create the folder. Test-Path is doing the work of checking if the folder already exists and New-Item is then creating a directory at that path if one does not already exist.
And that’s it.
Have you seen the light?
If you are one of the people who would have manually created the folders, hopefully this has given you a new perspective. Of course you’re not going to be able to sit down and start writing scripts just by having read this post, but maybe you’ll now have motivation to hunt down some PowerShell tutorials and start learning.
In my example I wrote a script that saved me from having to manually create 100 folders. It maybe took me 15-30 minutes to write and test that script. How long would it have taken to manually create the 100 folders? What if there were actually 1,000 folders to create? Well, the script can handle that too, without requiring any changes!
What if more users were added to that AD group next week and each required a new folder? Well, you could just run the script again and it would create the new folders.
But wait… having to run the script would be a manual task. Granted, it’s still much less time consuming than creating folders manually, but it’s still a little inconvenient.
Perhaps you could create a scheduled task to run the script every morning. That way any new users added to the AD group would automatically have a folder created. Plus, if anyone unintentionally deleted their folder it would be re-created (albeit without the contents).
Where to go from here?
- Look for online learning content
- Get familiar with the basics of PowerShell
- Bookmark the PowerShell documentation
- Put together a list of your simple, repetitive admin tasks that could be automated. Make these your first projects to tackle
- Start scripting!
Scripting is a skill and, like anything worth learning, it takes practice. You’re not going to become a master overnight. You’re not going to memorise every PowerShell cmdlet. What’s important is that you start changing the way you approach problems.
Look for manual tasks that you perform regularly. Break them down into steps. Translate those steps into PowerShell until you’ve built out the whole process. It might take you a while to get the script working, but once it is working that’s one less recurring manual task on your to do list!
Hopefully you see how much this can benefit you and those that are dependent on your work. Automate the mind-numbingly dull tasks out of your working life and spend more time focusing on the big picture projects that benefit everyone.
Any IT admin can create 1,000 folders. The smart admin will have a script do all the work for them!