mssql server service status screenshot

Microsoft SQL Server on Arch Linux

Part of my day job involves managing a system that runs on a MSSQL database. Because of that, I like to spend some time improving my knowledge of MSSQL and having a local installation is a great tool to play with. I recently installed Arch Linux on a Dell OptiPlex 3040 that I had lying around and decided to use it as a dev machine. This article covers how I installed Microsoft SQL Server on Arch Linux. I do this using AUR repositories.

Creating and Installing the Packages

First up, I create a location for my AUR repositories. Then I clone the GIT repositories that I need to get things up and running:

mkdir ~/aur
cd ~/aur
git clone https://aur.archlinux.org/mssql-server.git
git clone https://aur.archlinux.org/msodbcsql.git
git clone https://aur.archlinux.org/mssql-tools.git

mssql-server – this is for the main MS SQL Server installation
msodbcsql – this is for connecting to MS SQL Server
mssql-tools – these are the command line tools for interacting with MS SQL Server

Once the GIT repos have been cloned, it’s time to build the packages for installation using makepgk.

cd ~/aur/mssql-server
makepkg -sirc
cd ~/aur/msodbcsql
makepkg -sirc
cd ~/aur/mssql-tools
mkpkg -sirc

When running makepkg I use the following options:

-s – installs any missing dependencies using the package manager
-i – installs the package after it has been built
-r – removes any dependencies required by the build process that aren’t required afterwards
-c – cleans up any leftover work files or directories created during the build process

Now all three of the packages should be installed. The mssql-server service should also now be running and enabled to start automatically. You can check by running:

systemctl status mssql-server.service

The output should hopefully look something like this:

mssql server service status screenshot

If it’s showing as “inactive (dead)” you can easily start the service and enable it to run automatically:

systemctl enable --now mssql-server.service

You can then confirm that it’s running by using the command shown previously.

Initial Setup of SQL Server

At this point it’s time to run the setup utility for SQL Server. You can view the options for this tool by running:

/opt/mssql/bin/mssql-conf --help

There are a few useful options in here, like resetting the sa (database admin) password. However in this instance I just want to run the initial setup utility:

/opt/mssql/bin/mssql-conf setup

This tool will walk you through setting the admin password, choosing which edition of SQL Server to run, setting the language and accepting the licencing terms.

After running that setup utility you’re done! You should now have a working installation of Microsoft SQL Server running on Arch Linux. Easy-peasy!

Installing Azure Data Studio

Unfortunately Microsoft haven’t released a Linux version of SQL Server Management Studio. However, there is an alternative, albeit one that isn’t as feature packed as SSMS. That alternative is Azure Data Studio.

Azure Data Studio a MSSQL management tool that is built on top of the Microsoft Visual Studio Code editor. It’s perfectly fine for interacting with SQL Server but it does lack all the “wizards” that you can access from the menus in SSMS.

If you want to install Azure Data Studio there is an AUR repo for that too!

cd ~/aur
git clone https://aur.archlinux.org/azuredatastudio-bin.git
cd ~/aur/azuredatastudio-bin
makepkg -sirc

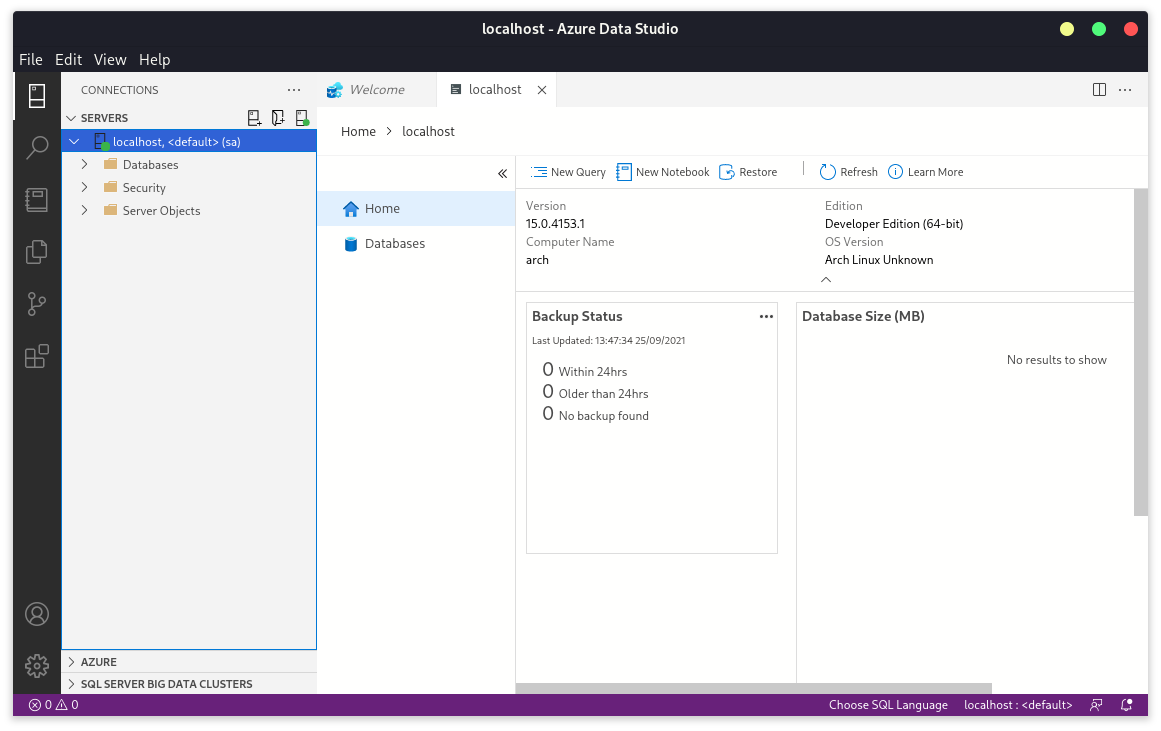
Once installed you should be able to launch Azure Data Studio, connect to your local SQL instance and start playing!

azure data studio screenshot

Lab network diagram

Learn by Doing – Build a Home Lab

Getting your start in IT administration is exciting but can also be a daunting experience. I landed my first IT job working a helpdesk and, in just over a year, moved into a System Administrator role. While I was generally able to get things done, I was well aware that I didn’t understand how a lot of the infrastructure worked. Domain Controllers, firewalls, hypervisors, Active Directory, Group Policy… the list goes on. It was all new to me.

As someone who learns best by building things for myself, it’s tough trying to learn new things in an already established environment. It’s rare that a core piece of infrastructure needs rebuilt and is probably not a task that would be handed to the new guy. I was interested and motivated enough to self-learn, so it was time to look for another way.

Sooner or later I came across the concept of a “home lab” (thanks /r/homelab) and that was the game changer! For a relatively low cost I could build out my own “Enterprise environment” at home and create a network from nothing. I took full advantage of this and found it to be brilliant learning experience that I still use to this day.

The Server

Back in 2015 I bought a Lenovo ThinkServer TS140. It cost me £330 (new) and is about the size of your typical desktop tower PC. It lives behind my sofa. Out of the box it came with an Intel Xeon CPU E3-1226 v3 @ 3.30GHz, 4GB 1600MHz DDR3 UDIMM RAM, a 1TB HDD and a single NIC. I didn’t think the 4GB of RAM would cut it, so I added an additional 16GB, bringing it up to a total of 20GB RAM.

This reasonably priced server is still running my home lab environment in 2021! The only other upgrade it has seen since then was the addition of an SSD, but even that was salvaged from an old laptop.

These days some people might ask why I bother running a server at home instead of hosting everything with a cloud provider. If it weren’t for the fact that I already have the server, I might consider cloud hosting. It would be a good chance to play around with Azure but, ultimately, I don’t want the recurring monthly cost. My 6 year old ThinkServer is still doing just fine. If I ever feel the need for an upgrade, I’d be tempted to look in the direction of an Intel NUC, but they’re significantly more expensive.

Installing a Hypervisor – VMware ESXi

Anyway, now that I have the physical server, I want it to be running multiple virtual servers. To do this, I install a Type 1 hypervisor. At work I use VMware’s ESXi, so that’s what I use in my home lab.

You can download, install and use VMware’s ESXi hypervisor for free. The main limitation being that you cannot run vCenter for free. vCenter is what allows you to manage multi-host clusters and do the fancy stuff like migrating running VMs between hosts. In my single server setup none of that is needed, so it’s not a deal breaker.

Installing ESXi is a breeze. You just download the installer from VMware, create a bootable USB, pop it into your server and power it on. Once it runs through the installation, all that’s really left to do is set the root password and the network settings. From there, go to your desktop machine, open your browser and go to the IP address of the server. You should be greeted with a web interface for managing the host. Done!

VMware Networking

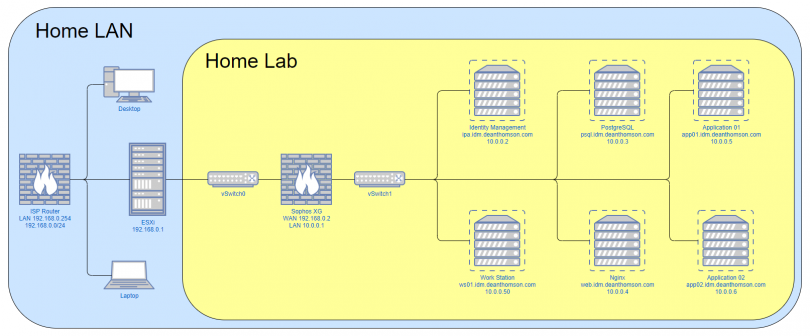
Something I like to do with my home lab environment is keep it separated from my home LAN. This allows me to more easily mimic an enterprise environment in the lab without having unwanted side effects on my home devices. E.g. I might want to run my own DHCP and DNS servers in the lab but don’t want my normal devices using those services. I do this by using virtual switches in VMware and creating a separate network that only exists in the virtual environment. However, it is useful to be able to access the lab from my main desktop PC, so I use a firewall (also a virtual machine) to act as a gateway between the two networks. I then set a route on my PC to send traffic for that network through the gateway. More on that later.

In VMware I need to create two vSwitches. vSwitch0 is linked to the physical NIC on the Lenovo server. vSwitch1 is not linked to a physical NIC. I then create a couple of Port Groups in VMware: External, which is associated with vSwitch0 and Internal, which is associated with vSwitch1.

Whenever I add a new VM within VMware, I link it’s virtual NIC to the “Internal” port group (vSwitch1). This means that all my VMs can speak to each other, but don’t have direct access to my home LAN or the internet. Again, I’ll address this in the next section, but the end goal is to get the network looking something like the diagram below. If you click on the image an enlarged version will open in a new tab.
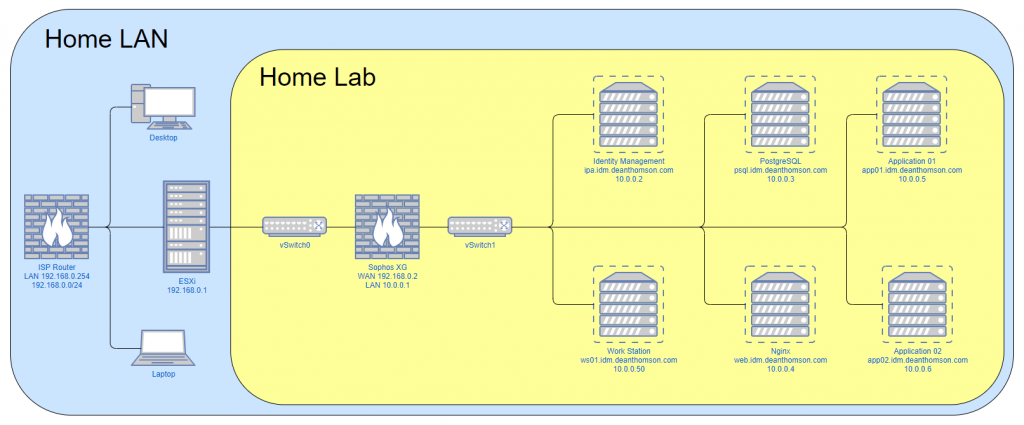
Lab network diagram

Adding a Firewall – Sophos XG

As I mentioned earlier in the post, the firewall is used to act as a gateway between my home LAN and the lab environment. It runs as a VM with two virtual NICs. One NIC is linked to the “External” port group and the other is connected to the “Internal” port group. This gives the firewall VM access to both networks. The other virtual servers can use the firewall as their default gateway and speak to the outside world, assuming firewall rules exist to allow this.

Normally I use pfSense for my firewall, but this time I wanted to try something different. At work we use Sophos UTM but now often hear that Sophos XG is the product that Sophos would prefer you to use. As it turns out, Sophos allow you to use either firewall free of charge for home use. UTM Home Edition comes with the limitation of only allowing management of 30 IP addresses. XG Home Edition, on the other hand, imposes a hardware limit of 4 CPU cores and 6GB RAM. Other than that, it’s the same product as the paid for enterprise version. In my lab I’m unlikely to exceed either limit so the home editions are great to play with.

I actually had a bit of a rough time installing Sophos XG, but it turned out to be completely my fault. By default, Sophos XG only allows access to the admin interface from the LAN port (my internal virtual network). I wanted to do the initial setup from my desktop PC, which is on the WAN (my home LAN) side. After some fiddling in the XG console, I found a command that allowed access from the WAN port:

sophos enable appliance access

system appliance_access enable

This did the trick and I could now access the admin interface from the WAN port. Sophos XG definitely feels far more user friendly than the convoluted screens of Sophos UTM but I’ve seen others comment that it lacks the full feature set of UTM. Regardless, it’s perfectly fine for my use case. It took no time to get my firewall rules set up and begin testing, but testing is where the problems (of my own making!) started.

Fixing a Silly Mistake

I spent more time than I’m willing to admit trying to figure out why my VMs could not access the internet. They could resolve external DNS names, but not access the web, ping hosts, etc. I checked all the network adapter settings, I checked the VM networking settings, and checked all my firewall rules. I did all of these things multiple times. Everything was right, so why couldn’t I get internet access?

If you were paying attention to the screenshot of the “system appliance_access enable” command that I ran earlier, you’ll know the problem. The output of that command states: “All internet traffic will be dropped”. The solution was to revert that change with “system appliance_access disable”. Now, everything works as expected. Thankfully, Sophos XG has another method of allowing access to the admin interface from the WAN port without dropping all internet traffic.
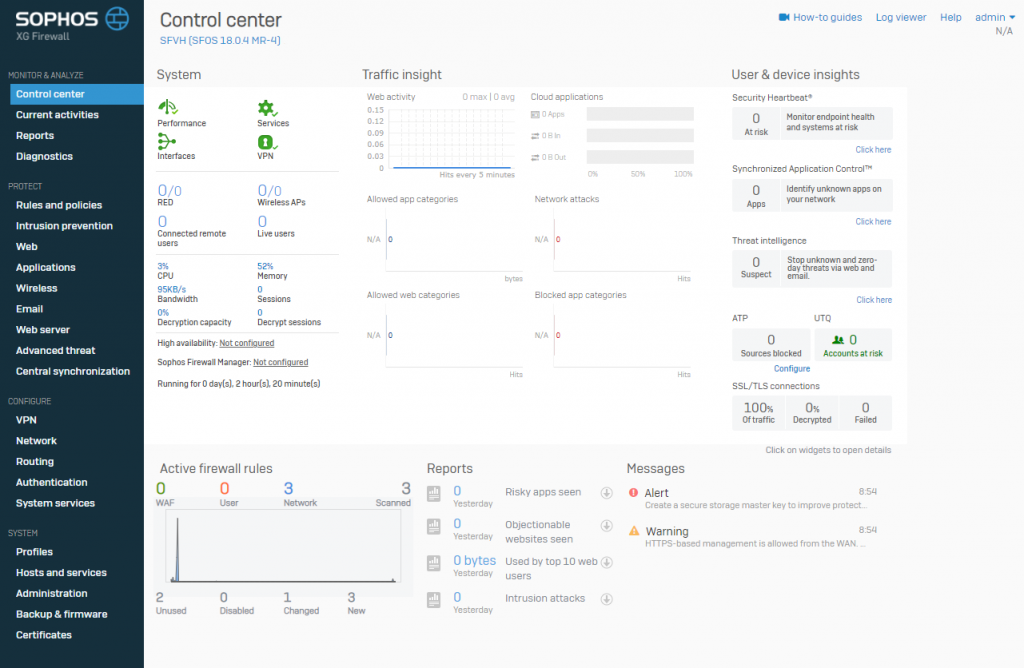
sophos xg dashboard

Under normal circumstances you would almost never want your firewall’s management interface to be accessible from the WAN port. In my case the WAN is actually my home network (which is why I’m happy to enable access) but in an enterprise environment it will likely be “the internet”. You certainly don’t want random internet users/bots trying to find ways to exploit the management interface and gaining access to your firewall config, so don’t make it easy for them!

All Done

And with that, my initial home lab network is essentially complete. All that’s left to do is start installing some VMs and using them to learn new things.

Back in 2015 when I first set up my home lab I used it to run a Windows Domain. Microsoft provide evaluation releases of Windows Server, which you can use for 180 days free of charge. I created a couple of Domain Controllers and configured them to act as DNS + DHCP servers. From there I made sure to domain join any other Windows servers I added and even domain joined a laptop I had that was running Windows 7 Pro.

The goal was essentially to try and create a miniature version of the environment I use at work. Building a Windows Domain from the ground up is a great learning experience and far easier than you might think. You don’t have to stop there either. Setup a WSUS server. Play around with Group Policy. Configure web filtering on your firewall. Add your imaginary friends as Active Directory users!

Having the ability to play with all these technologies at home is a fantastic learning tool. Not only do you learn how all these things work, but you also learn how to troubleshoot enterprise level issues without the pressure of an entire company waiting for the fix.

If you’re trying to set up a home lab for the first time, chances are that at some point something wont work. You’ll run into issues with your network config or the firewall rules or DNS/DHCP settings. If something isn’t working, don’t give up! Spend the time to troubleshoot it. The whole point of a home lab is to learn new things and troubleshooting these types of issues is definitely a useful skill to have.

Deploying Django Applications with Nginx and Gunicorn

This week I spent some time working through the Mozilla Developer Network’s Django Tutorial. One of the final chapters covers the process of deploying a Django application. To my disappointment, it only covered deployment to Heroku. I frequently see Nginx and Gunicorn mentioned in discussions about Django deployment, so wanted to try using these instead.

Although the setup covered in this post still isn’t ideal for production use, it’s hopefully enough to point you in the right direction. I took some shortcuts to prevent this post from being too long, but have left a summary of some suggested changes at the end of the post.

As a side note, the MDN Django tutorial was really good. If you’re interested in learning how to write Django apps, I’d recommend that tutorial rather than the one on the official Django website. However, this post only covers the deployment of Django apps, not the creation of them.

I should also mention that I tend to use CentOS as my server OS of choice. Command examples shown in this post were all executed on a CentOS 8 server.

Step 1: Creating a Python Virtual Environment

If you’re not familiar with Python virtual environments, they essentially allow you to have multiple Python environments running on the same machine. Each Python environment also has it’s own set of modules. This is useful if you’re running multiple Python apps on the same machine requiring different versions of the same module. E.g. one app may require Django 2 while the other requires Django 3.

In this case I probably don’t need a Python virtual environment, as I only run the one app, but it’s a good habit to get into regardless.

# Create the project directory
mkdir djangoproject

# Create the virtual environment
python3 -m venv ~/djangoproject/djangoenv

# Enable the virtual environment
source ~/djangoproject/djangoenv/bin/activate

# Upgrade PIP
pip install --upgrade pip

The third line in the set of commands above is where I enable the virtual environment I just created. So whenever I run python or pip from this point on, it’s running the binaries stored in ~/djangoproject/djangoenv/bin. Running “deactivate” would take me out of the virtual environment and back to using /bin/python3

Step 2: Installing Django

For the purposes of this overview, I’ve just installed Django and created a new Django Project without adding to it. This is good enough to test the basic deployment.

# Install Django
pip install django

# Initialize a new Django project
django-admin startproject djangoproject ~/djangoproject/

# Run the Django development server to test it worked
python ~/djangoproject/manage.py runserver

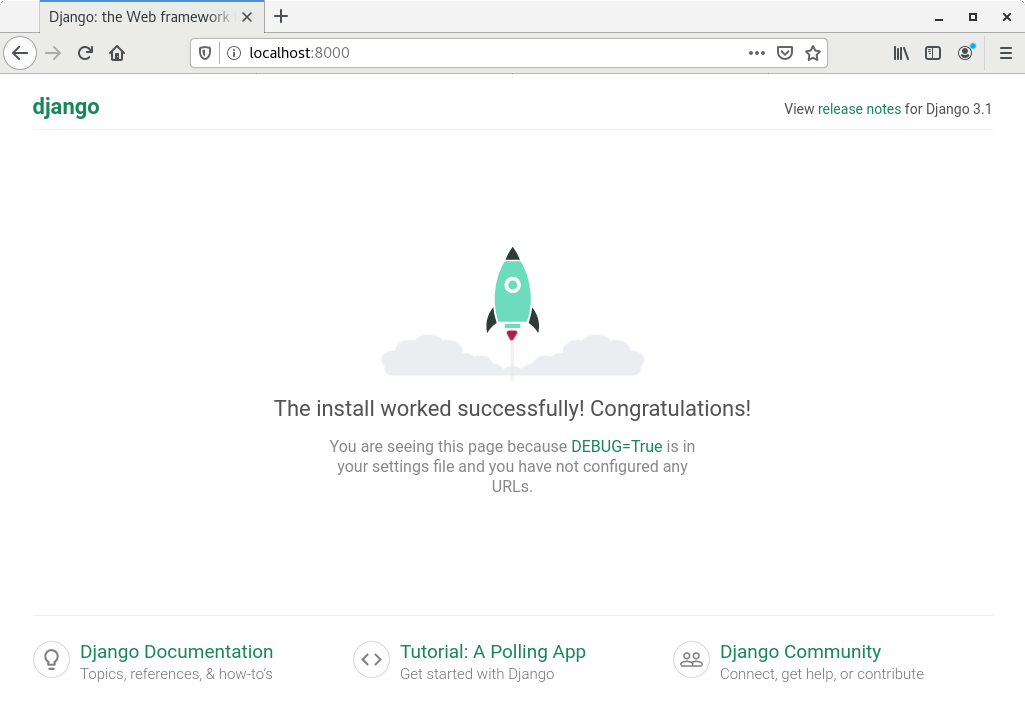
Now when I go to http://localhost:8000 I can see that the Django app is running:

Django success screen

Step 3: Installing and Testing Gunicorn

As mentioned earlier, the Django development server is not intended for production use. One common approach is to use the Gunicorn WSGI (web server gateway interface) server in it’s place.

# Install Gunicorn
pip install gunicorn

# Move into the Django project directory
cd ~/djangoproject

# Have Gunicorn listen on port 8000 and serve the Django project
gunicorn --bind localhost:8000 djangoproject.wsgi:application

The last command in the block above is telling Gunicorn to listen on port 8000. It will also translate and pass on the web requests to the Django app. http://localhost:8000 returns the same page as before, but this time served via Gunicorn rather than the Django development server.

Gunicorn sits between the web server and the Django application. Client requests for static files (images, CSS, JavaScript, etc.) can be dealt with by the web server or a CDN. Any requests for the dynamic Django content will be passed from the web server to Gunicorn.

Step 4: Running Gunicorn as a SystemD Service

If this was a production server, I wouldn’t want to have to manually restart the Gunicorn server if it crashed or after a system reboot. Thankfully, SystemD makes it really easy to create a service to do this for us.

The code block below shows the contents of my Gunicorn service file: /etc/systemd/system/gunicorn.service

[Unit]
Description=gunicorn daemon
After=network.target

[Service]
User=dean
Group=dean
Restart=on-failure
WorkingDirectory=/home/dean/djangoproject
ExecStart=/home/dean/djangoproject/djangoenv/bin/gunicorn --bind unix:/home/dean/djangoproject/gunicorn.sock djangoproject.wsgi:application

[Install]
WantedBy=multi-user.target

Notice that I’m running the service using my user account – “dean”. If this was a production server, I’d create a gunicorn account and use that instead. I would also move the Django project files out of my home directory.

Now that the service has been defined, it can be enabled (to start automatically after a reboot) and started:

sudo systemctl enable --now gunicorn.service

Step 5: Setting Up Nginx

To save some hassle, I’ve set SELinux to permissive mode at this point (setenfore 0). By default, SELinux doesn’t like the gunicorn.service trying to access files in my home directory. Given more time, I’d use the system audit logs to create an appropriate SELinux policy. That is a whole topic in itself.

The code block below shows the partial contents of my Nginx config file. I’ve added this “server” block as the first element of the “http” block in /etc/nginx/nginx.conf

...
server {
    listen 80;
    server_name localhost;

    location / {
        proxy_set_header Host $http_host;
        proxy_set_header X-Real-IP $remote_addr;
        proxy_set_header X-Forwarded-For $proxy_add_x_forwarded_for;
        proxy_set_header X-Forwarded-Proto $scheme;
        proxy_pass http://unix:/home/dean/djangoproject/gunicorn.sock;
    }
}
...

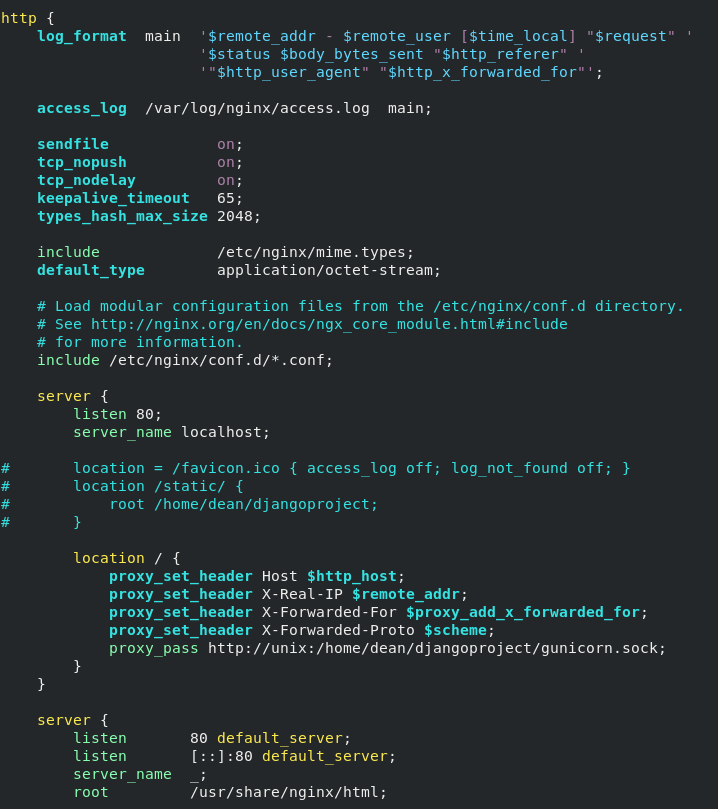
The screenshot below gives some more context of where this fits in the Nginx config file. There are also a few extra lines that I’ve commented out. The first just prevents requests for the favicon being logged. The next two are for getting Nginx to serve Django’s static files, but that’s not something I’ve covered in this post.

nginx config file contents

Nginx is really just a reverse proxy in this example. It passes all the requests over to Gunicorn.

All that’s left to do is enable the nginx service (sudo systemctl enable –now nginx), go to http://localhost:80 and see the same webpage that we saw earlier. Exciting stuff!

Web requests hit the server. Nginx forwards them on to Gunicorn. Gunicorn forwards them on to the Django project and back comes the HTTP response.

You’ll notice that the port has changed from 8000 to 80 because Nginx is listening on port 80. The previous examples used port 8000 as this is the default port that the Django development server listens on. However, as defined in the SystemD service file, Gunicorn is now using a Unix socket to communicate with Nginx rather than a TCP/IP port, so is no longer listening on port 8000. Because Nginx and Gunicorn are both running on the same machine there is no real need for them to use a network socket to communicate with each other. The Unix socket is more efficient for this.

Finishing Up

If, like me, you’re new to deploying Django web apps, hopefully this helps get you started. Initially it felt like a lot of work to get running, but looking back over this post there really wasn’t much to it.

At the start of the post also I mentioned that this setup still isn’t ideal for production environments. Below are a few of the potential issues with using this setup in production:

  • Django is not configured to serve static files. Nginx can be configured to do this or the files can be hosted and served from elsewhere
  • My home directory probably isn’t the best place to store the Django project files
  • The SystemD Gunicorn service could be running as a gunicorn user account with folder permissions changed accordingly (rather than running as my user)
  • Rather than disabling SELinux, extra time could be taken to create a custom policy for the Gunicorn service
  • Although databases weren’t covered in this post, Django should be reconfigured (djangoproject/settings.py) to use something other than SQLite
  • Serve over HTTPS
Mastodon